Using Scratch for making games is one of the best decisions that one can make and the most important factor to make any game the best is to add scores to it. Adding scores to the game makes it fun for the players to play and it also helps them to keep the track of the character’s movement and performance in the game.
So, to set up a score in Scratch, you need to create a variable named ‘score’ and add it to your game. Now, before going to the part about how to create a variable in Scratch, it is first important to learn what a variable is.
Looking to learn Scratch coding? Explore Wiingy’s Online Scratch Coding Classes For Kids to learn from top Scratch coding experts.
What is a Variable in Scratch?
A variable is like a quantity that is used to store data but whose value is not fixed, that is, the value of the variable can be varied.
Let’s consider a real-world example to clearly understand the concept of variables. Suppose, your mom has given you a task to segregate the waste as dry waste and wet waste. For that, she has given you two boxes where one box is labeled as ‘dry waste’ and the other one is labeled as ‘wet waste’.
In this situation, the boxes represent the ‘variables’, the labels on the boxes represent the ‘variable names’, and the waste materials represent the ‘data’ which can be used as per the requirement of the situation.
Now, let’s see how to create a variable in Scratch and how to set up the score.
How to create a variable named ‘score’ in Scratch?
To create a variable named ‘score’ in Scratch, just patiently follow the below steps:
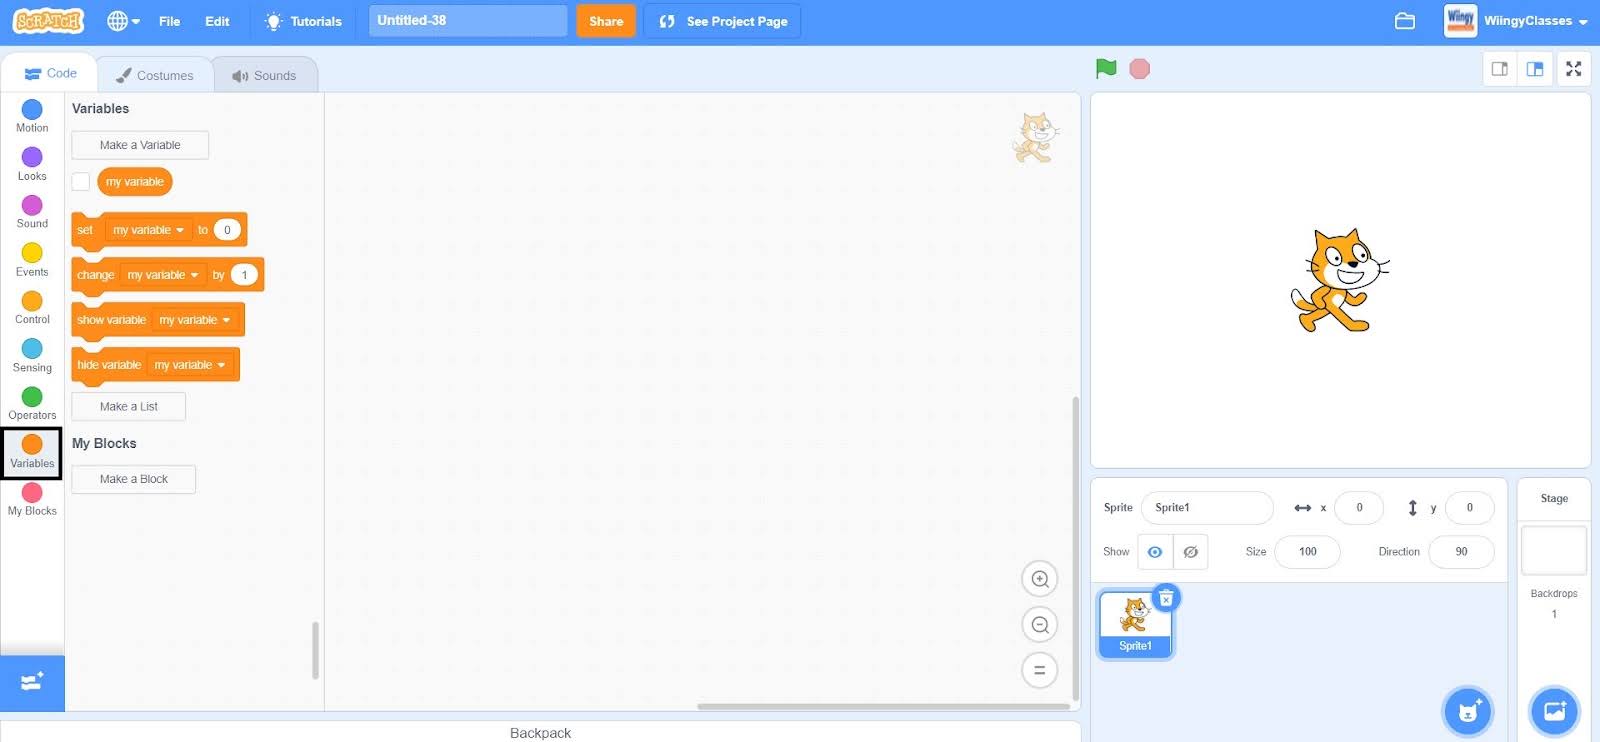
- Step 1: Go to the “Variables” block on the block palette.
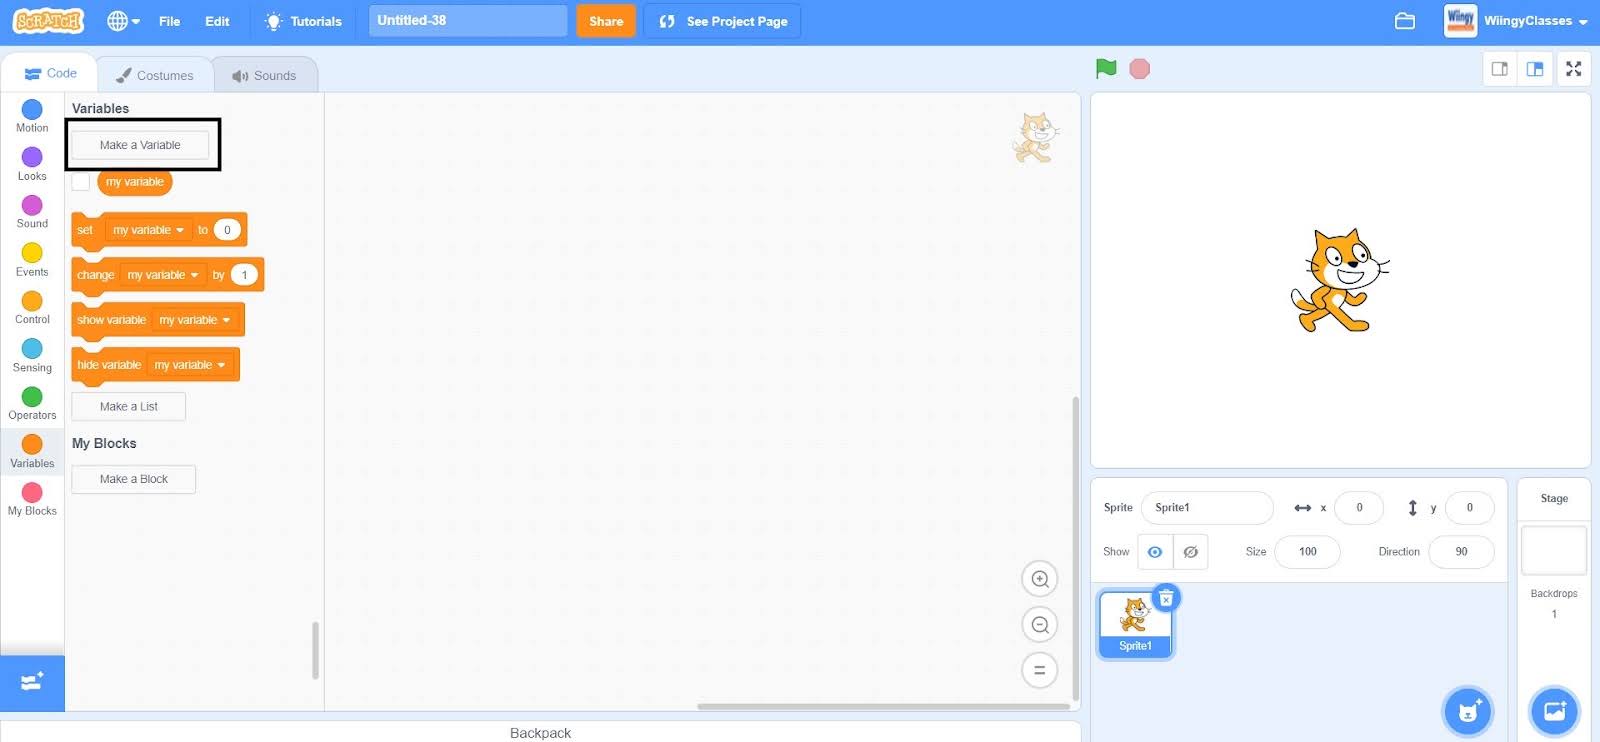
- Step 2: Once you go to the “Variables” block, click on the ‘Make a Variable’ option.
- Step 3: After clicking on the ‘Make a Variable’ option, the following screen will appear.
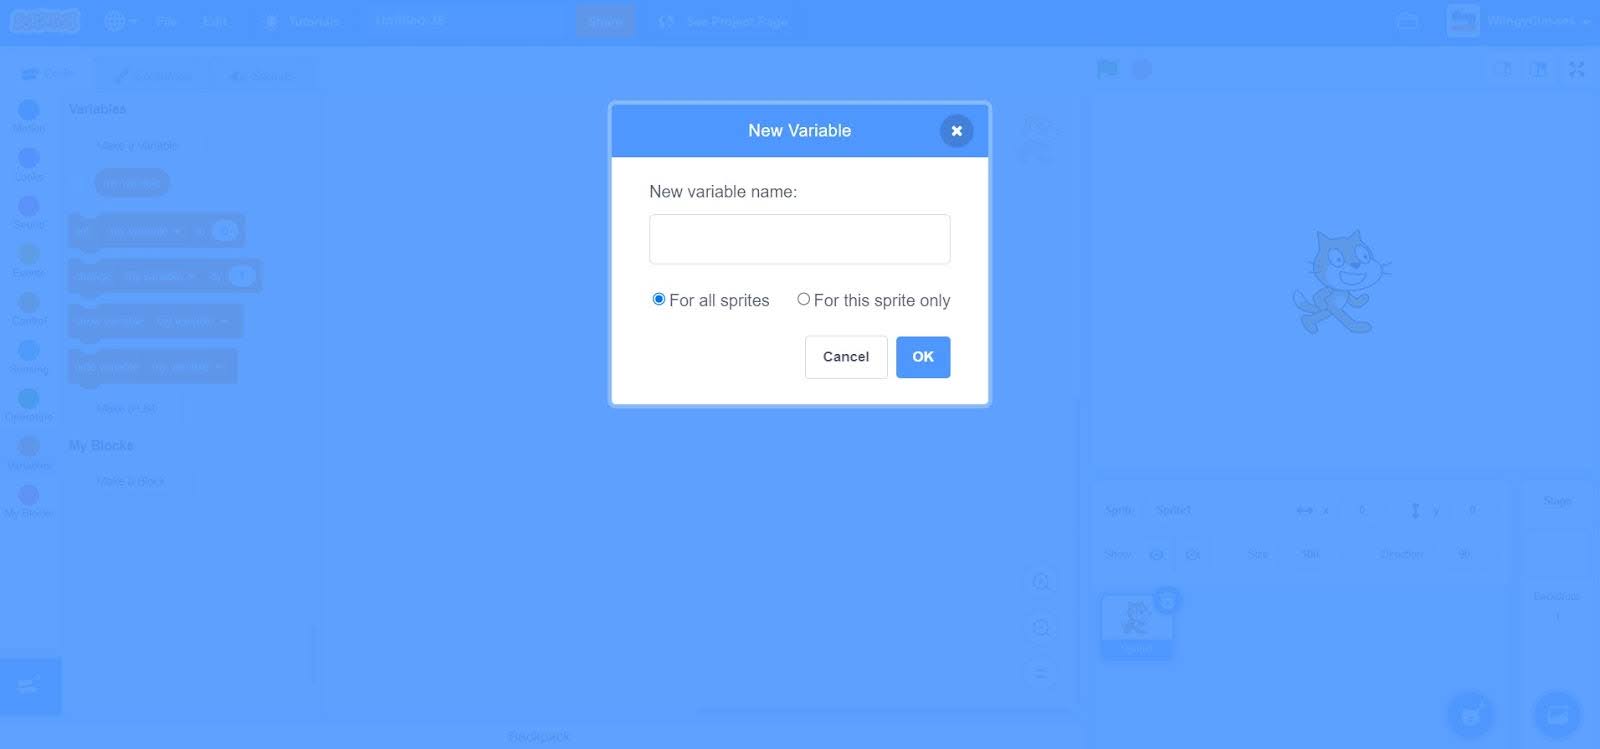
Here, you will see two options below the bar where you can enter the name of the variable: ‘For all sprites’ and ‘For this sprite only’.
The ‘For all sprites’ option makes the variable a global variable. It means that if you select this option while creating any variable, then that variable can be easily used, accessed, or modified for all the sprites of the project regardless of which sprite you’ve selected.
On the other hand, the ‘For this sprite only’ option makes the variable a local variable. It means that if you select this option while creating any variable, then that variable can only be used, accessed, or modified for the sprite on which you created it.
- Step 4: Since, you want to create the variable to keep the scores, so enter the variable name as ‘score’ and click on the ‘OK’ option available at the bottom right corner. For this variable, select the option of ‘For all sprites’.
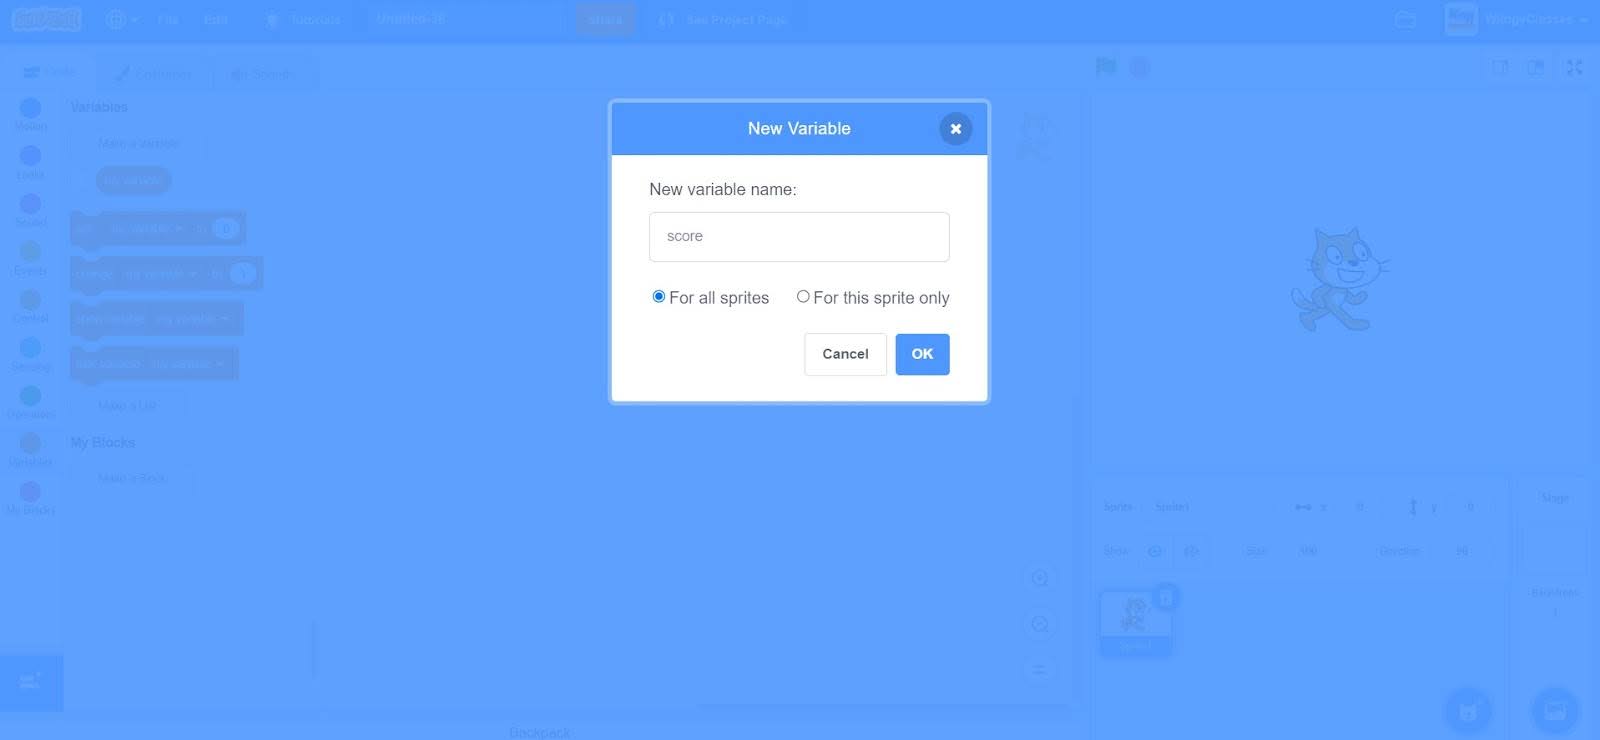
- Step 5: Once you click on the ‘OK’ option, the ‘score’ variable will be shown in the block palette as shown below.
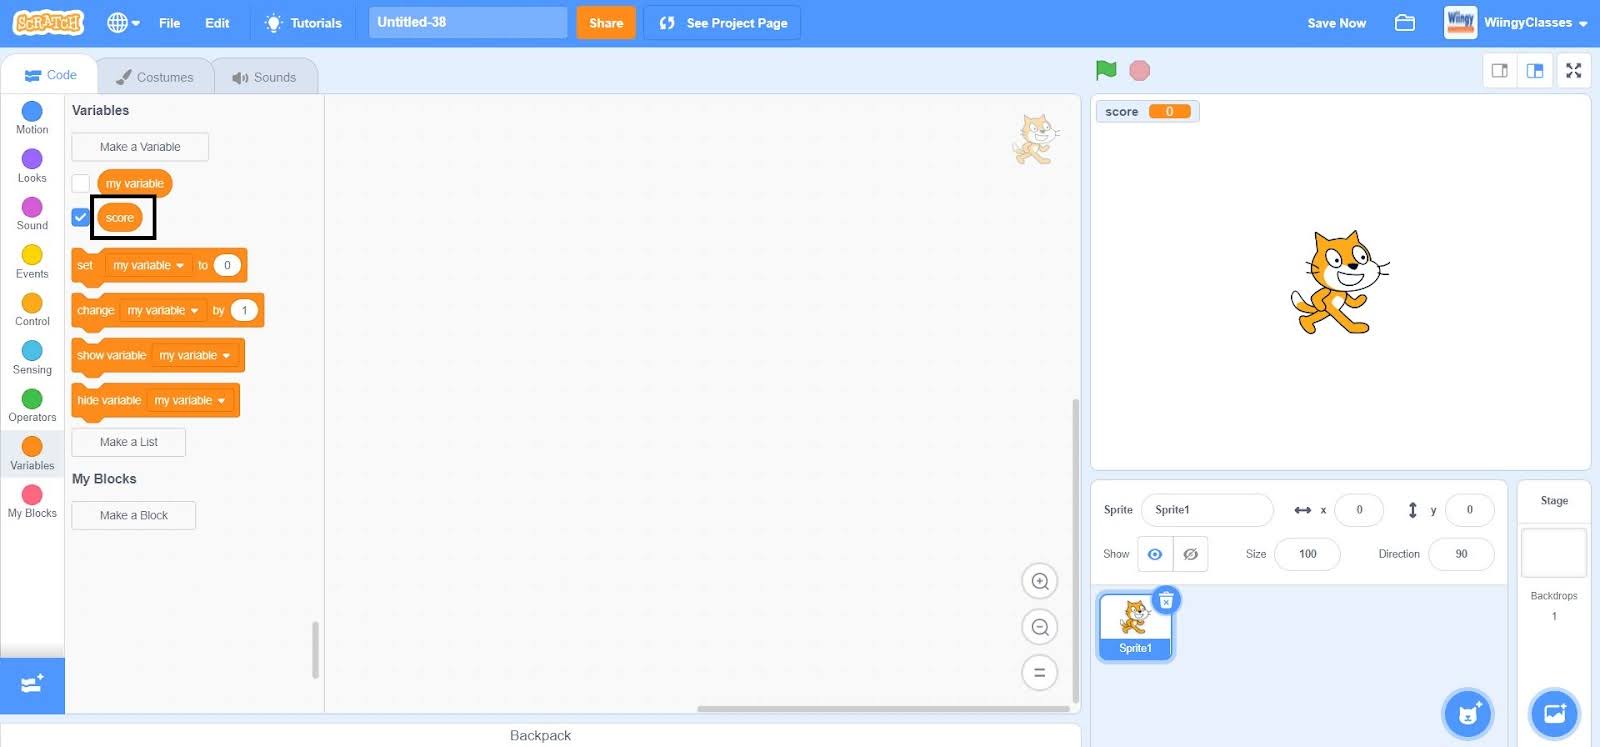
Different Variable blocks
Whenever you create a new variable, there are 4 different variable blocks that you can use along with the new variable.
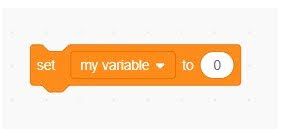
1. set (variable name) to (0)
This block is used to assign a particular value to the variable, you are working with. By default, the value present in this block is 0.
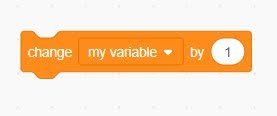
2. change (variable name) by (1)
This block is used to change the value of the variable, you are working with, by any value that you will assign. By default, the value present in this block is 1.
3. show variable (variable name)
This block is used to display the variable, you are working with, whenever required in the project.

4. hide variable (variable name)
This block works exactly opposite to that of the ‘show variable (variable name)’ block as it is used to hide the variable, you are working with, whenever required in the project.

Let’s look into a coding example.
- Step 1: Go to the “Events” block in the block palette, select the ‘when green flag clicked’ block, and drag it to the coding area.
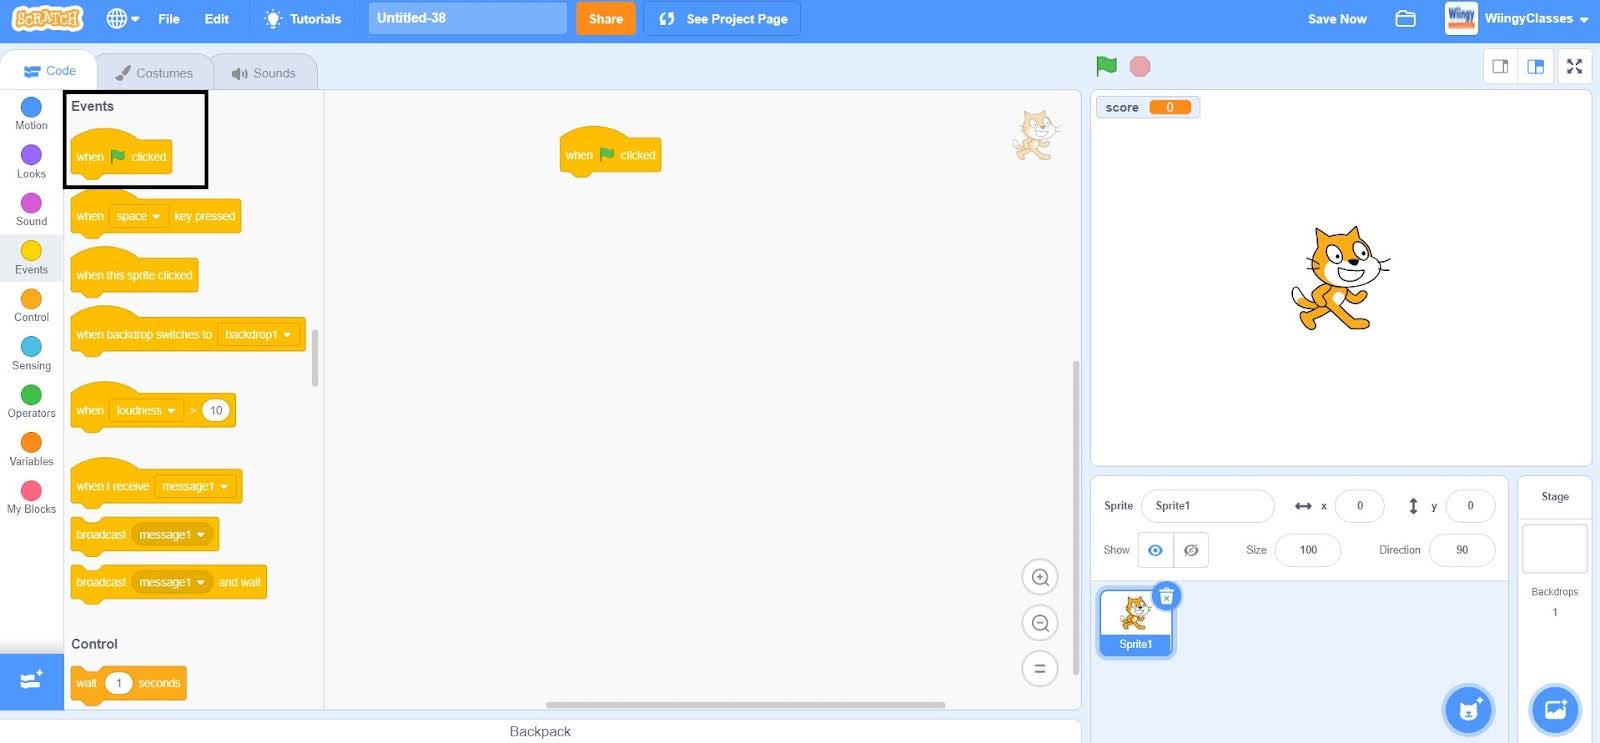
- Step 2: Go to the “Variables” block in the block palette, select the ‘set ( ) to ( )’ block, drag it to the coding area, and place it under the ‘when green flag clicked’ block.
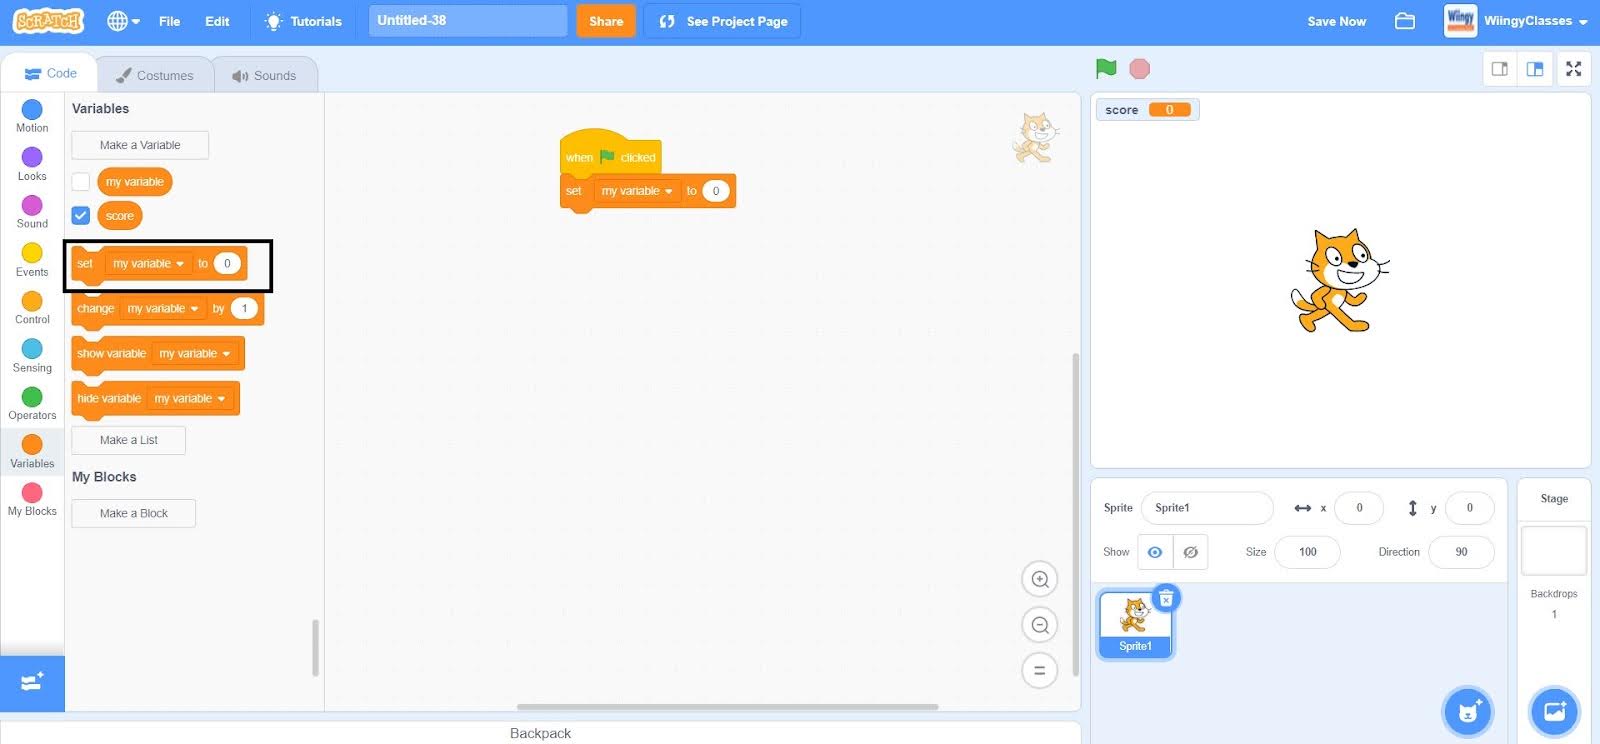
- Step 3: In the ‘set ( ) to ( )’ block, select the first value as ‘score’ from the drop-down menu and leave the second value as ‘0’.
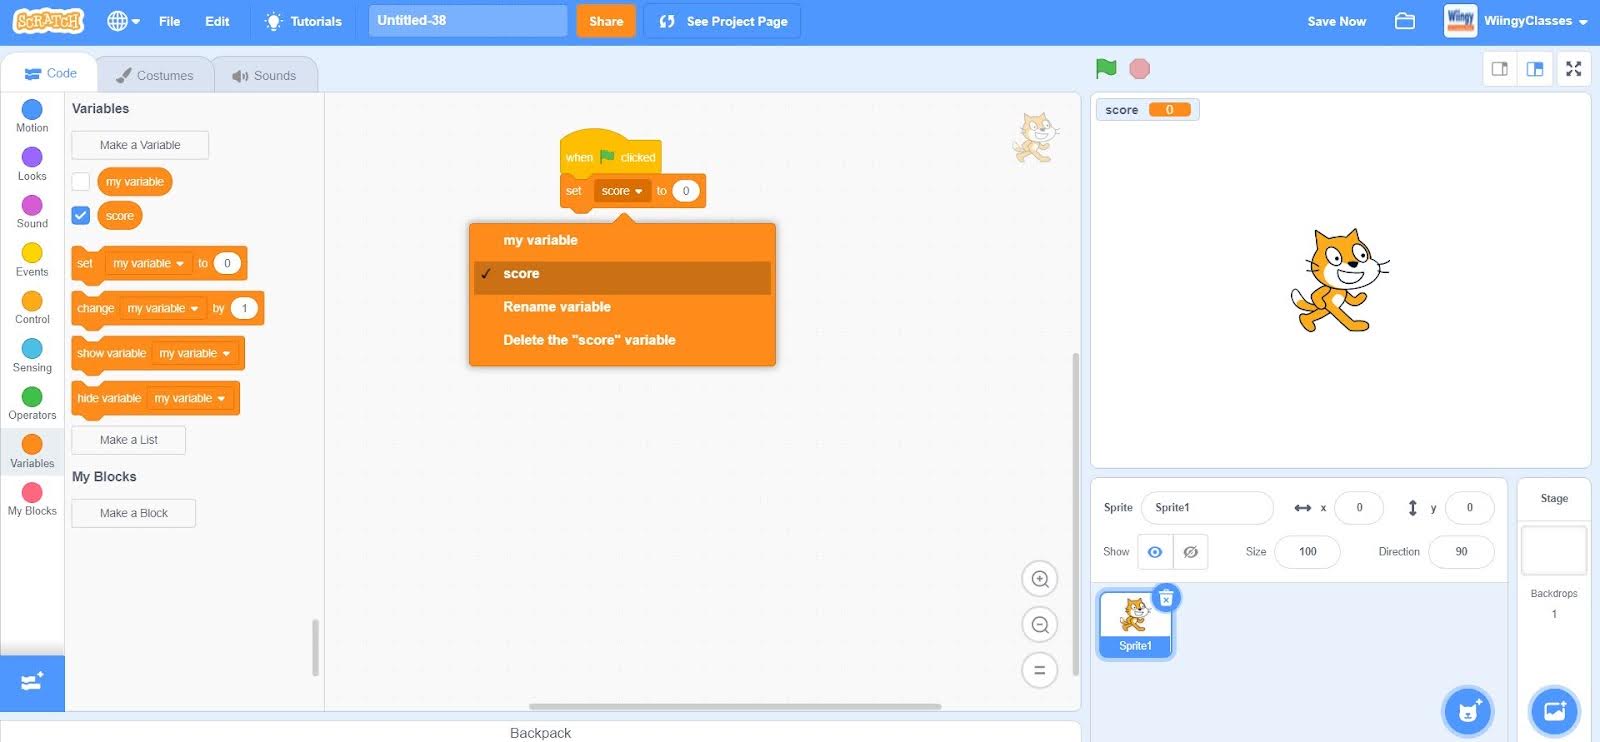
It is good and recommended to set the score to ‘0’ at the start of the game as it will help in tracking the performance of the character easily throughout the game.
- Step 4: Go to the “Control” block in the block palette, select the ‘forever ( )’ block, drag it to the coding area, and place it under the ‘set ( ) to ( )’ block.
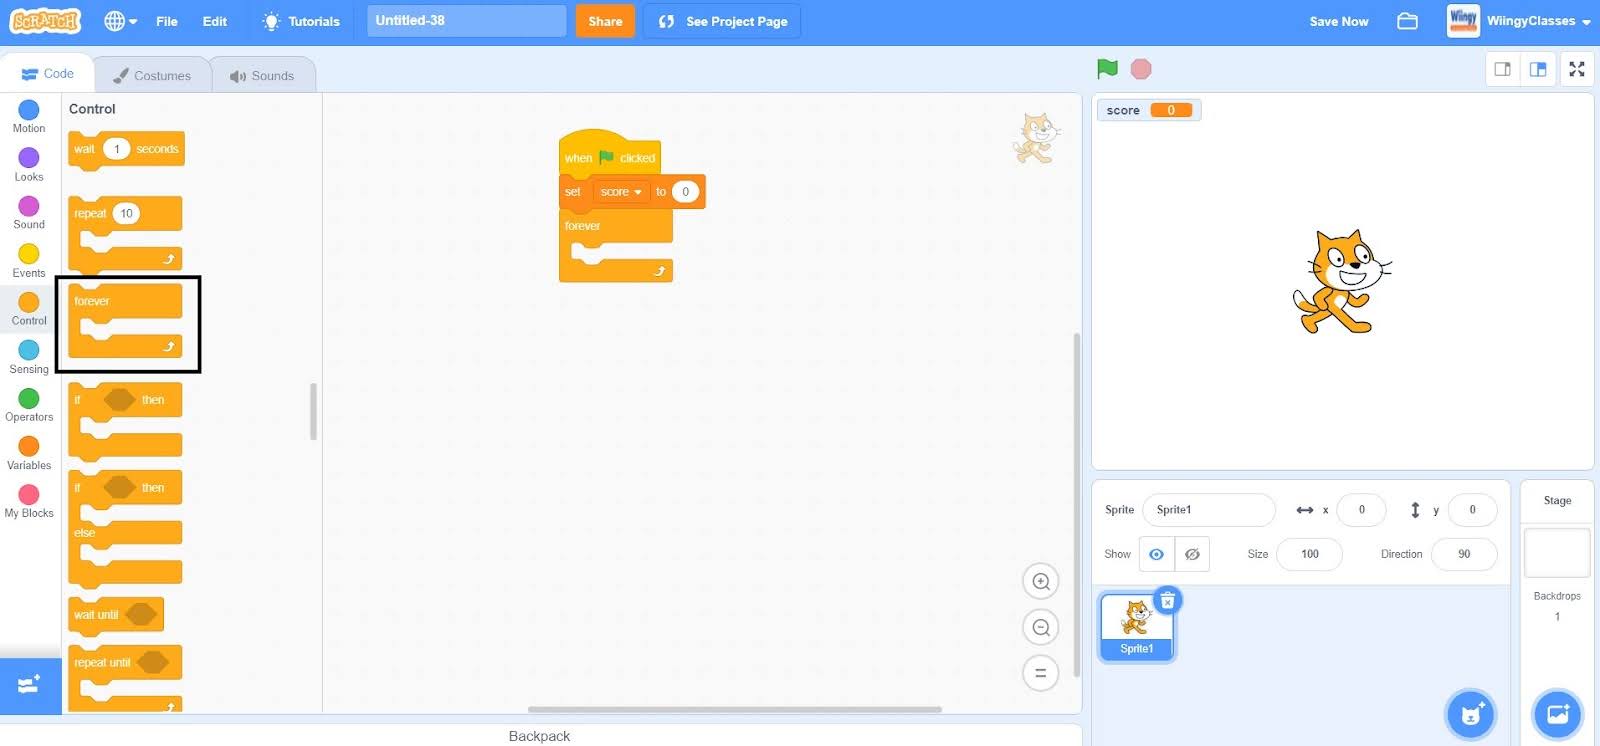
If you want to run a specific condition, again and again, it is a must to use the ‘forever ( )’ block.
- Step 5: From the “Control” block in the block palette, select the ‘if ( ) then ( )’ block, drag it to the coding area, and place it inside the ‘forever ( )’ block.
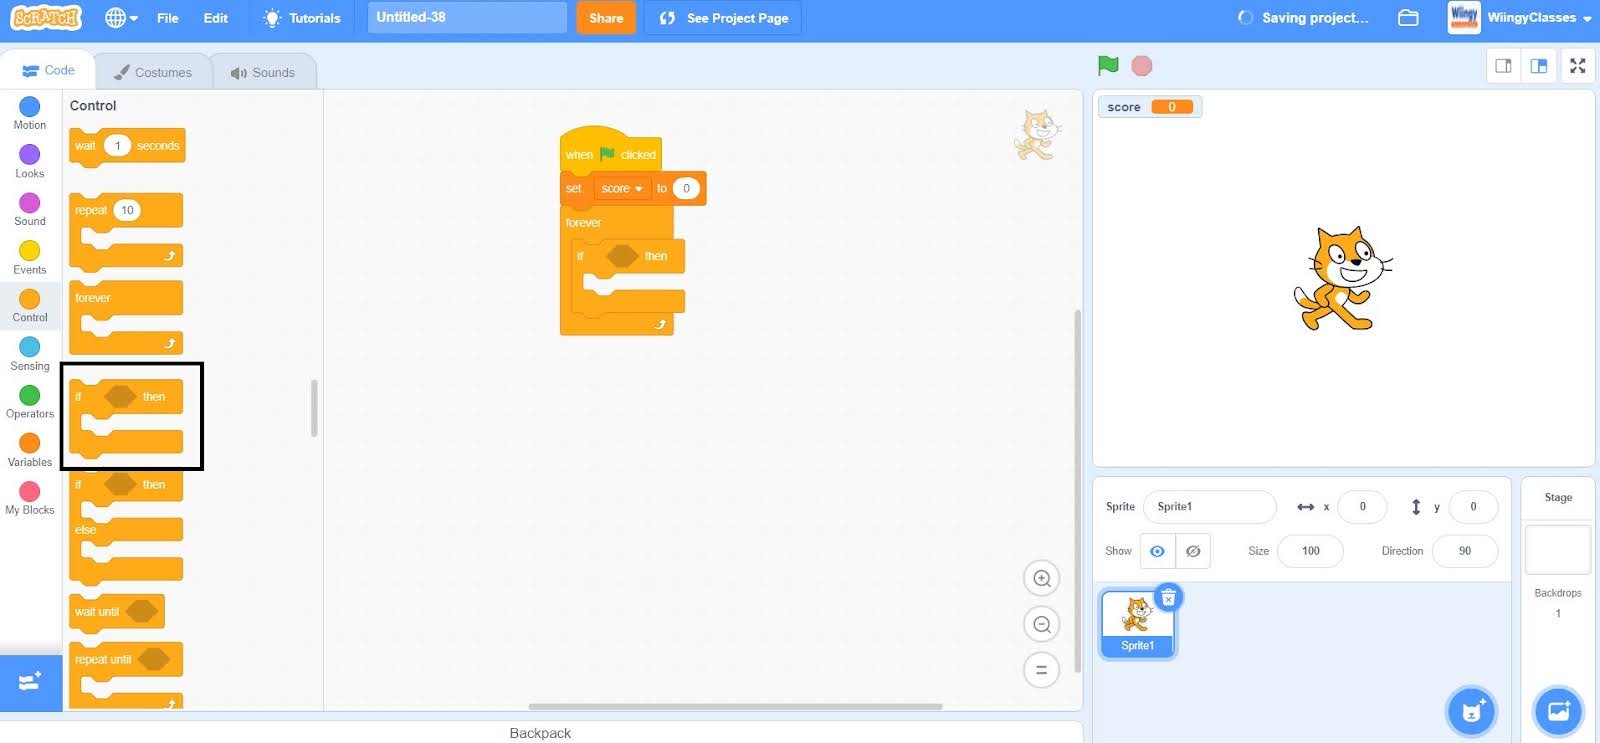
Now, depending on the condition of the game, the score can be increased or decreased using the ‘change ( ) by (1)’ block. So, in this game, if the sprite touches the color red, the score of the game increases by 5 and if the sprite touches the color black, the score of the game decreases by 2.
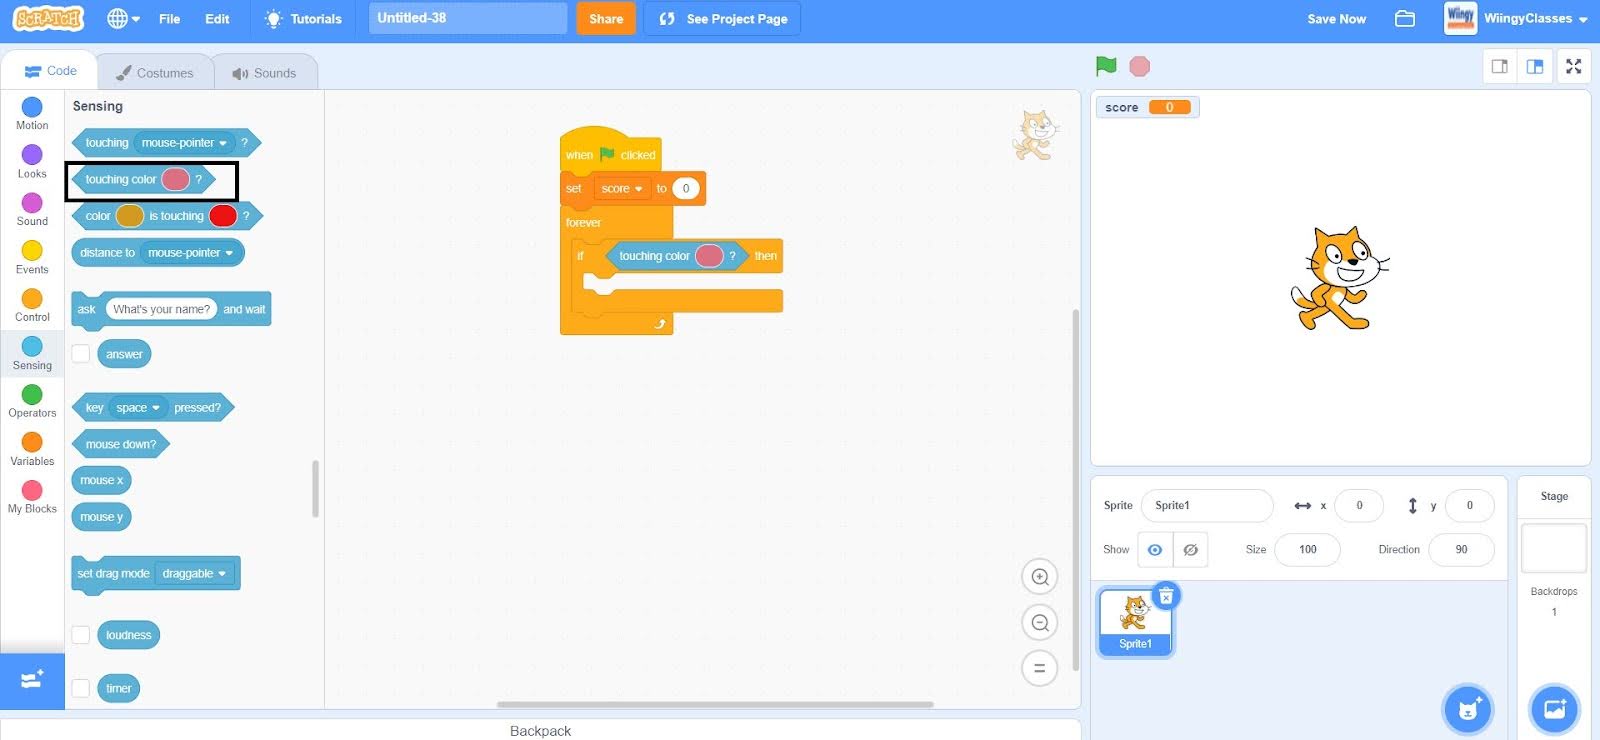
- Step 6: Go to the “Sensing” block in the block palette, select the ‘touching color ( )?’ block, drag it to the coding area, and place it in the if condition of the ‘if ( ) then ( )’ block.
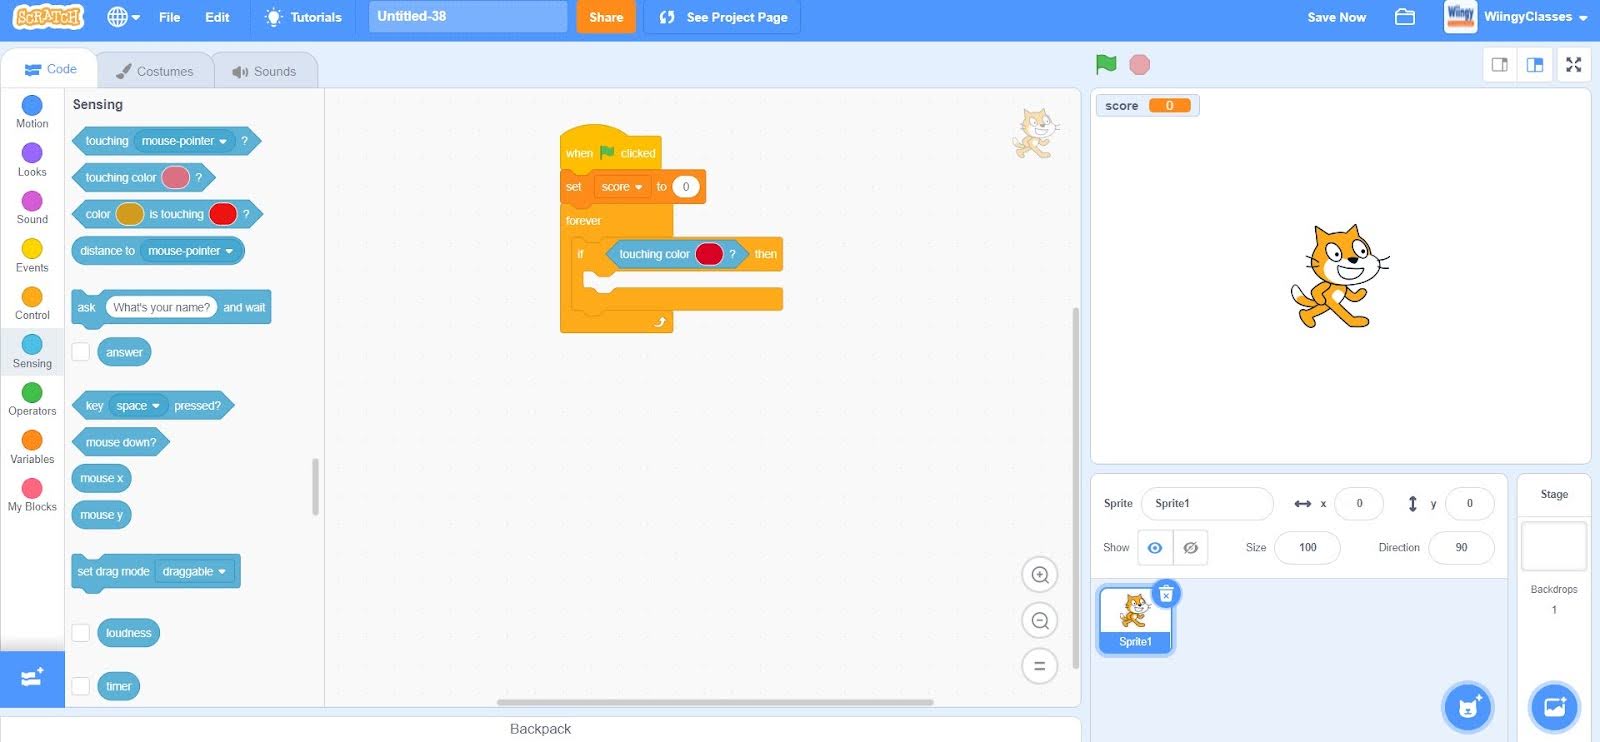
- Step 7: In the ‘touching color ( )?’ block, set the color as ‘red’.
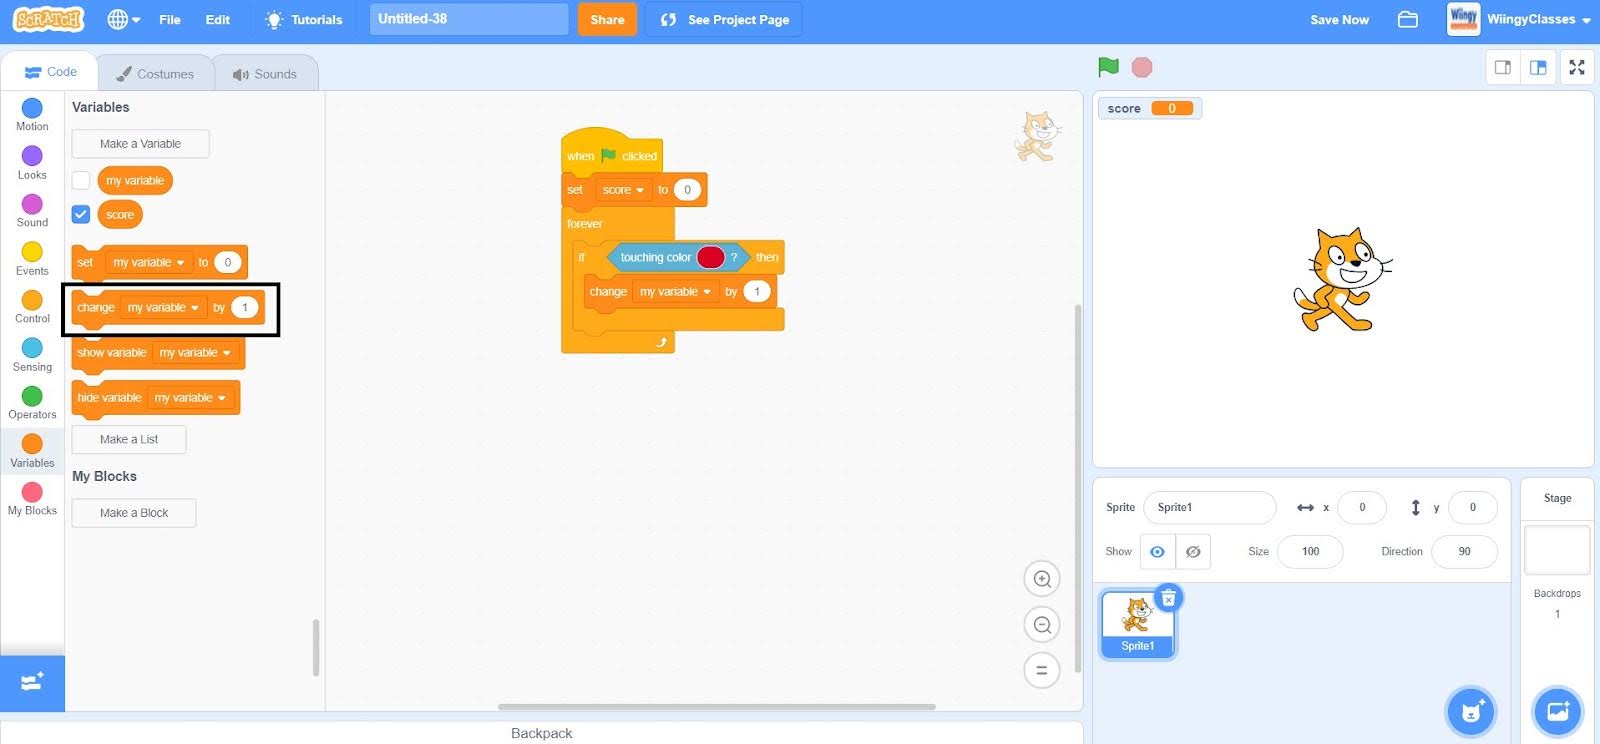
- Step 8: Since whenever the sprite touches the red color, the score of the game increases by 5, so go to the “Variables” block in the block palette, select the ‘change ( ) by ( )’ block, drag it to the coding area, and place it in the then condition of the ‘if ( ) then ( )’ block.
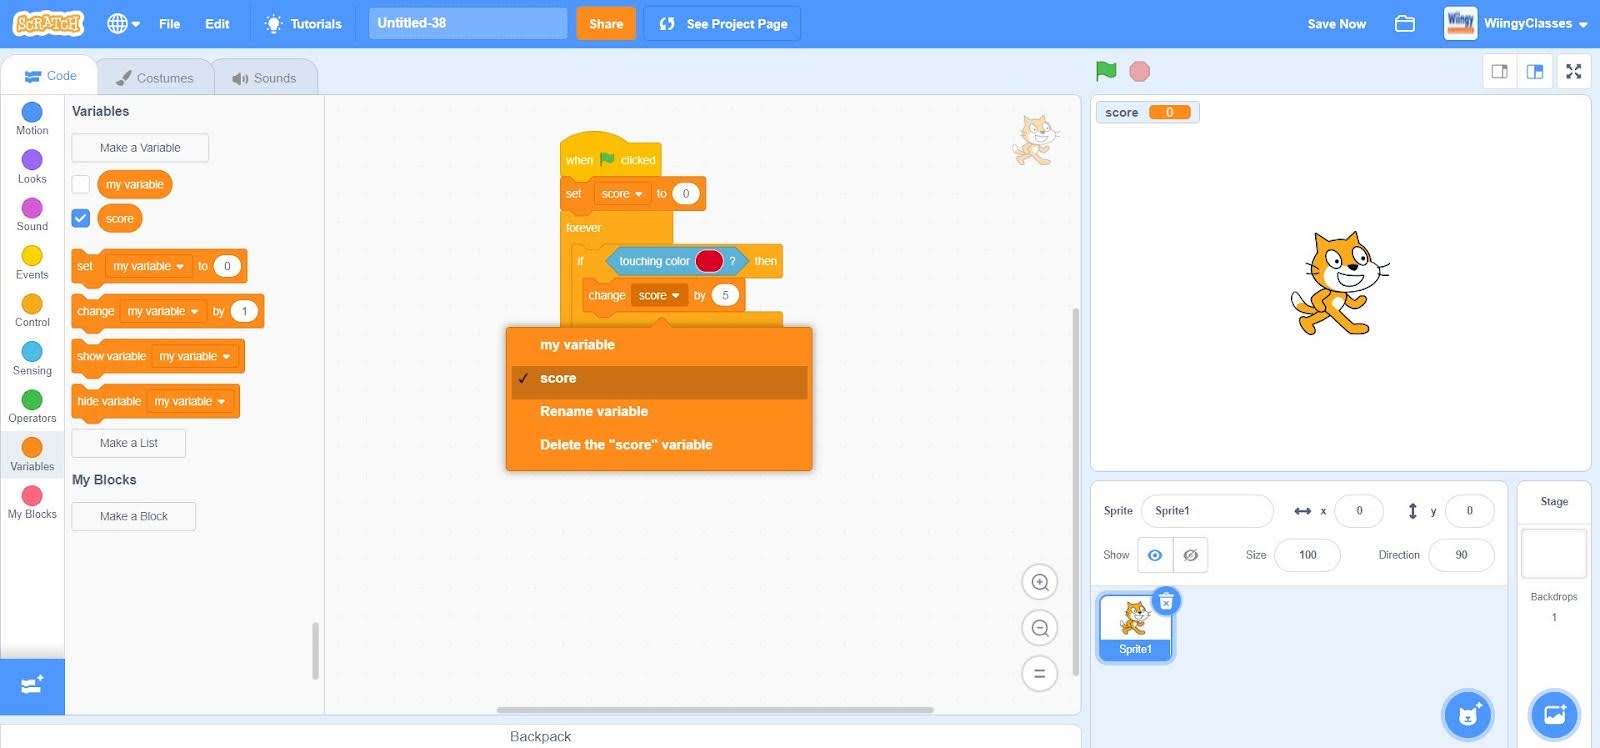
- Step 9: In the ‘change ( ) by ( )’ block, select the first value as ‘score’ from the drop-down menu and change the second value to ‘5’.
- Step 10: Again go to the “Control” block in the block palette, select the ‘if ( ) then ( )’ block, drag it to the coding area, and place it under the first ‘if ( ) then ( )’ block inside the ‘forever ( )’ block.
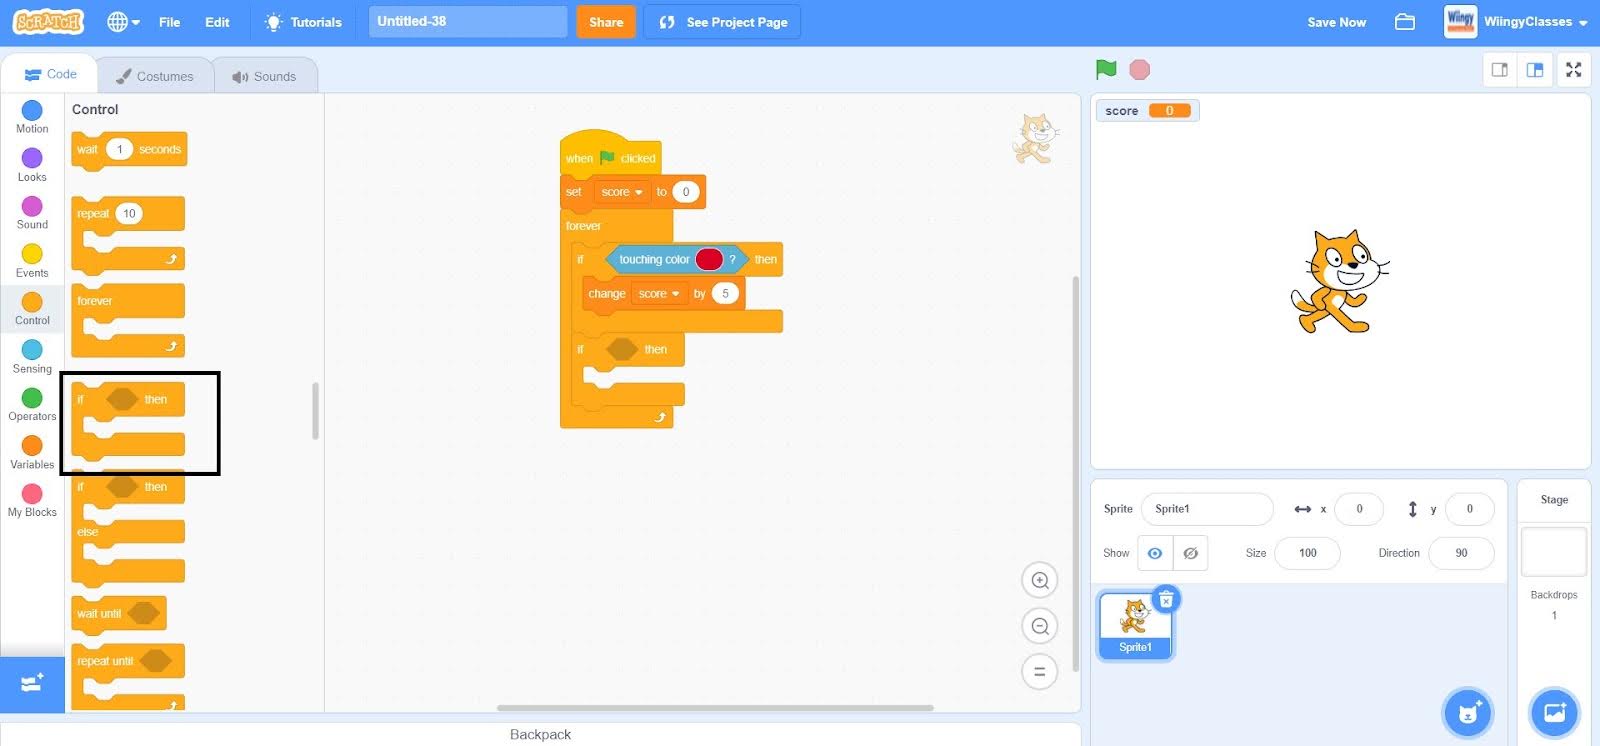
- Step 11: Go to the “Sensing” block in the block palette, select the ‘touching color ( )?’ block, drag it to the coding area, and place it in the if condition of the second ‘if ( ) then ( )’ block.
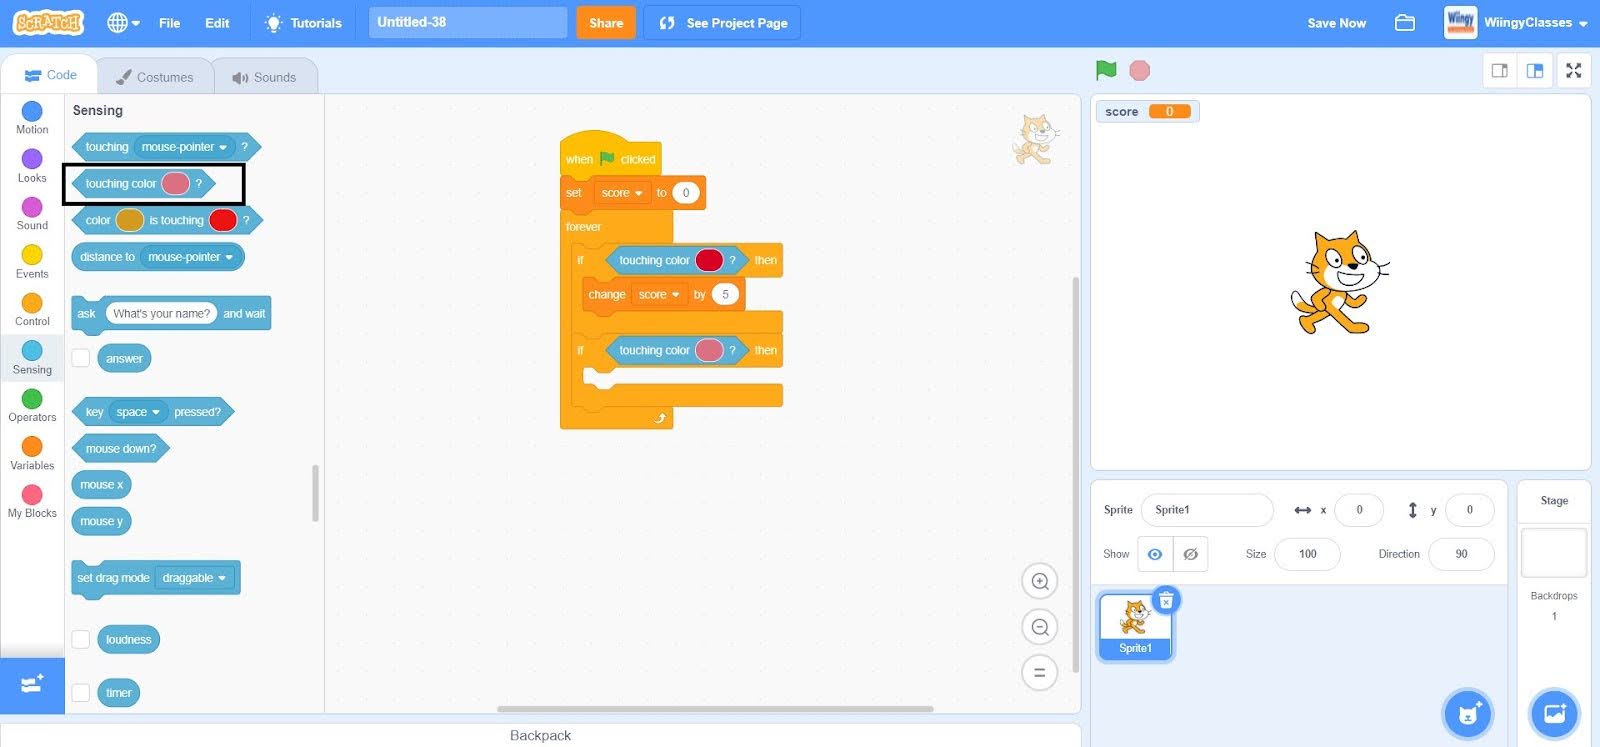
- Step 12: In the ‘touching color ( )?’ block, set the color as ‘black’.
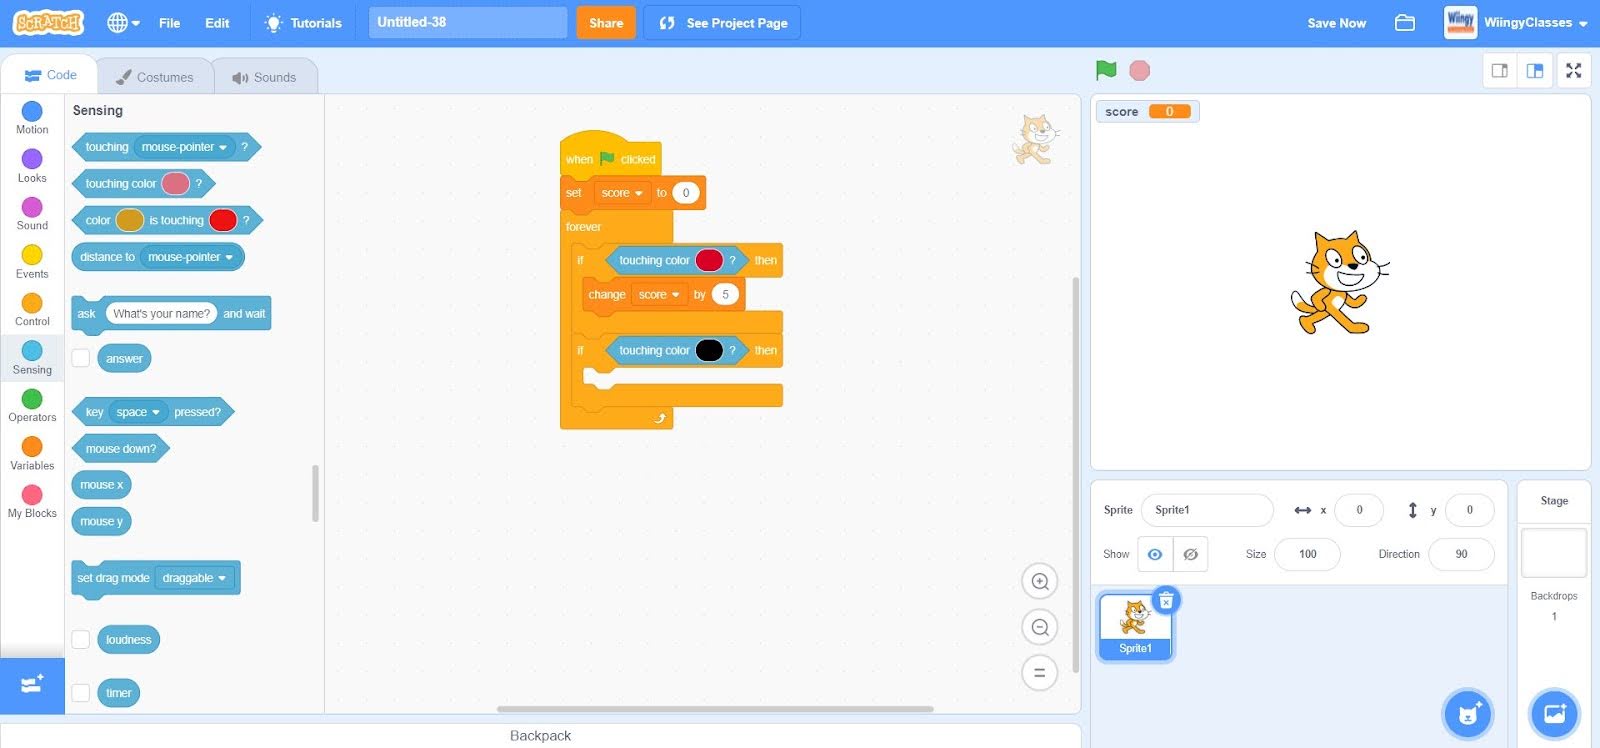
- Step 13: Since whenever the sprite touches the black color, the score of the game decreases by 2, so go to the “Variables” block in the block palette, select the ‘change ( ) by ( )’ block, drag it to the coding area, and place it in the then condition of the second ‘if ( ) then ( )’ block.
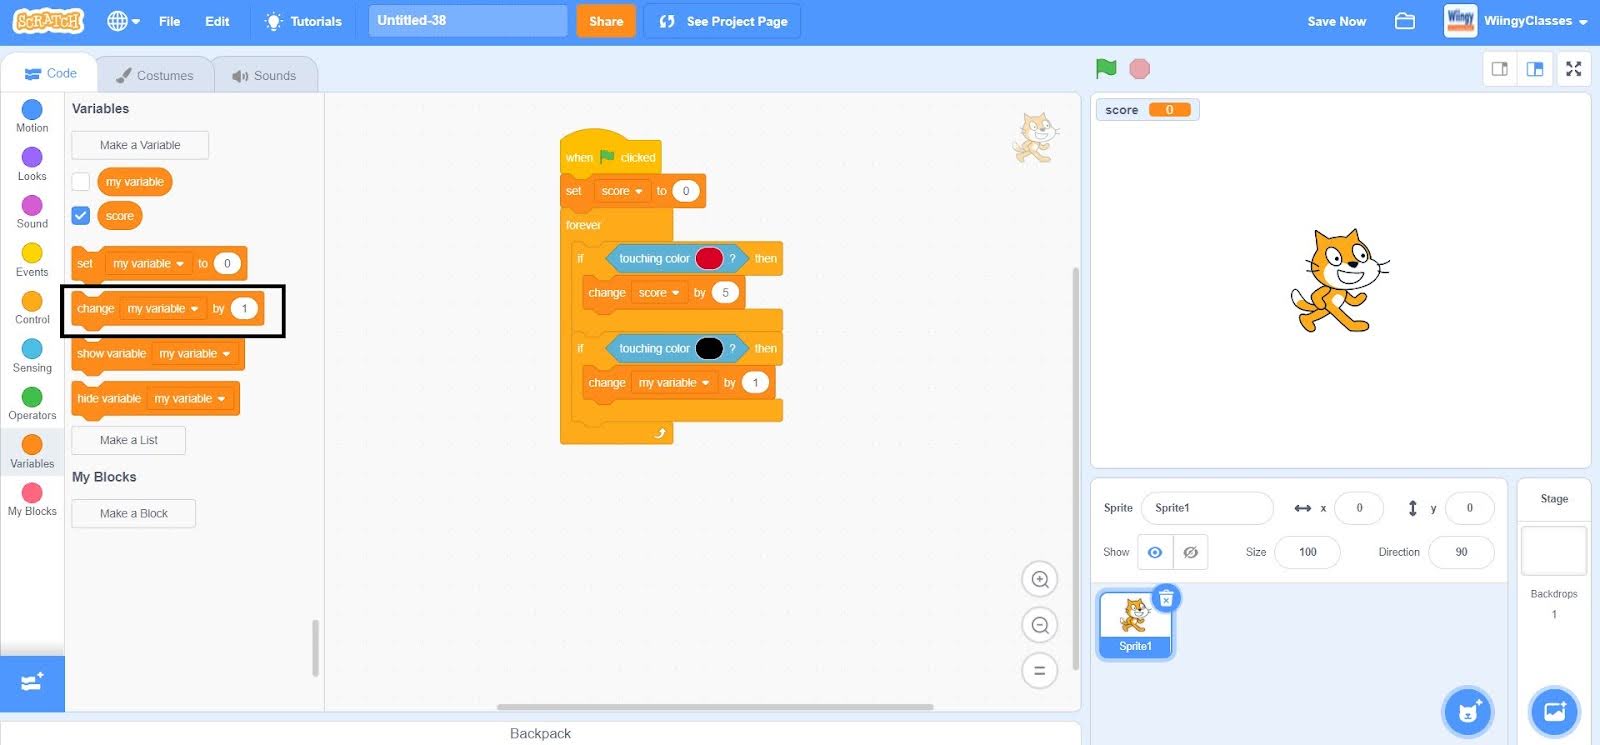
- Step 14: In the ‘change ( ) by ( )’ block, select the first value as ‘score’ from the drop-down menu and change the second value to ‘-2’.
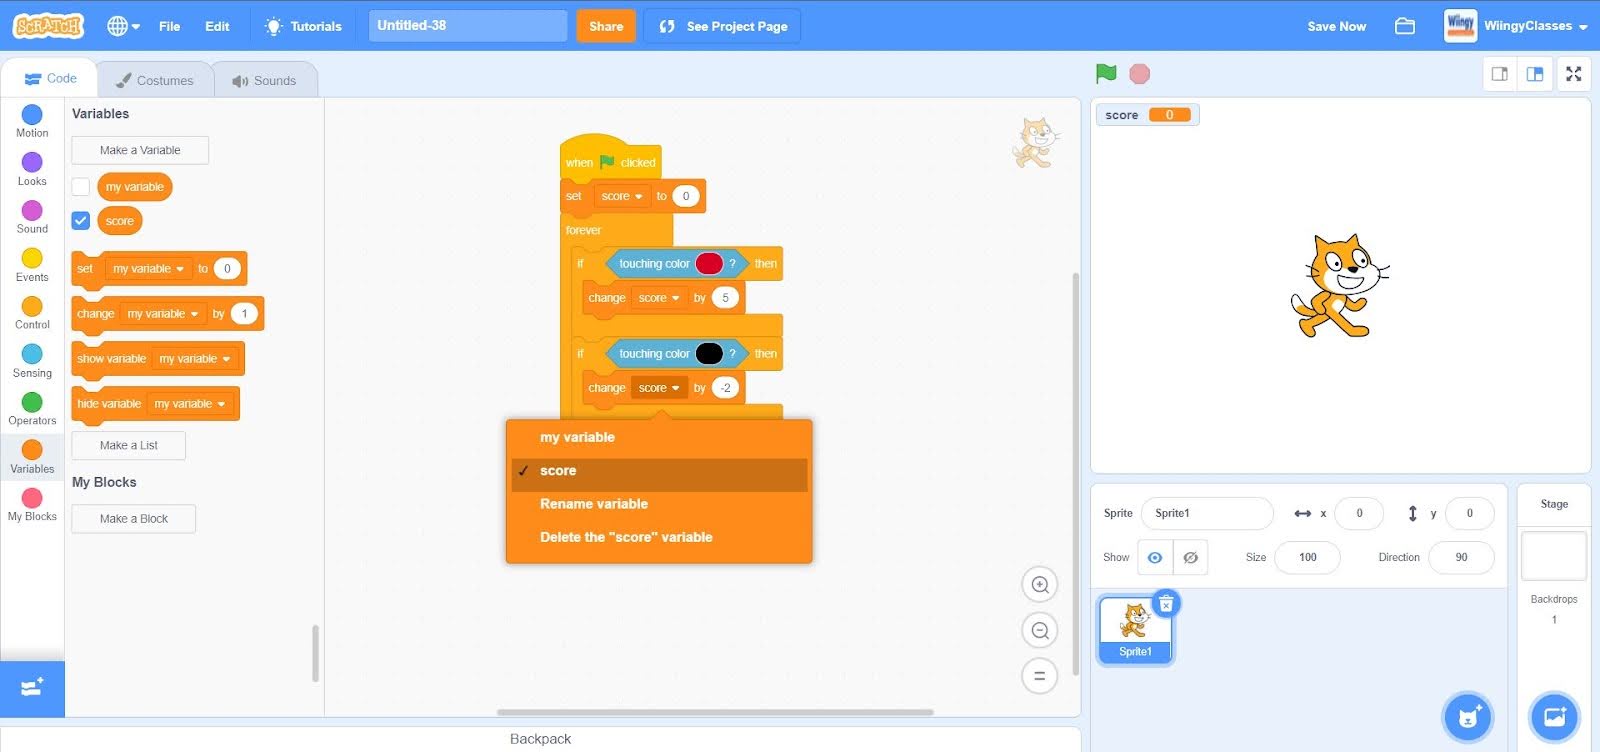
So, by following all the above-mentioned steps, you will easily understand the process of creating variables and setting up the scoring for any game.
Conclusion
Making games in Scratch is super fun!! You can make it more fun by adding additional elements to your game like adding a ‘score’ variable to keep track of the score points of the player.
Apart from adding a ‘score’ variable, you can also add other such things to your games to make them popular and fun to play.
Looking to learn Scratch coding? Explore Wiingy’s Online Scratch Coding Classes For Kids to learn from top Scratch coding experts.
FAQs on Score in Scratch
What is a variable?
A variable is like a quantity that is used to store data but whose value is not fixed.
What is the meaning of the ‘For all sprites’ option in Scratch?
In Scratch, the ‘For all sprites’ option is used to make the variable a global variable. It means that if you select this option while creating any variable, then that variable can be easily used, accessed, or modified for all the sprites of the project regardless of which sprite you’ve selected.
Why it is recommended to set the score to ‘0’ at the start of the game?
It is recommended to set the score to ‘0’ at the start of the game as it helps in tracking the performance of the character easily throughout the game.
When to use the ‘forever ( )’ block in Scratch?
If you want to run a specific condition, again and again, it is a must to use the ‘forever ( )’ block.
What is the ‘change (variable name) by (1)’ in Scratch?
In Scratch, the ‘change (variable name) by (1)’ block is used to change the value of the variable by any value that you will assign.
We hope you understand how to set up scoring in Scratch. If you have any doubts, you can ask your doubts in the comment section. You can try this process of setting up the score in some amazing games like multiplayer games or 3D games and to know about those games, you can read our blogs on multiplayer games in Scratch and 3D game in Scratch.
Other Useful Reads
How to Learn Scratch Programming
How to Make a Timer in Scratch
How to Make a Sonic Game on Scratch
How to Add Lives to a Scratch Game


Leave a Reply